iOS中使用blend改变图片颜色
在一个应用中, 常见的需求之一: 同一个图标但是有不同的颜色,一般的做法是让UI切出不同颜色的图片,这无疑会增加包的大小, 图片修改起来也会很痛苦~
在iOS5以及6的SDK部分标准控件引入了tintColer, 但是对于UIImageView的图片并没有好的效果,google学习一下;
准备一张带有alpha通道的图片,原始颜色是纯的灰色, 可以很好地看出来效果

我们需要做的就是在图片上tint另外一种颜色,并保持原有的alpha通道,用Core Graphics的做法如下:
1.创建一个上下文用以画新的图片
2.将新的tintColor设置为填充颜色
3.将原图片画在创建的上下文中,并用新的填充色着色(注意保持alpha通道)
4.从当前上下文中取得图片并返回
UIImage文档中提供了blend绘图的方法drawInRect: blendMode: alpha: ,首先了解一下blendMode:
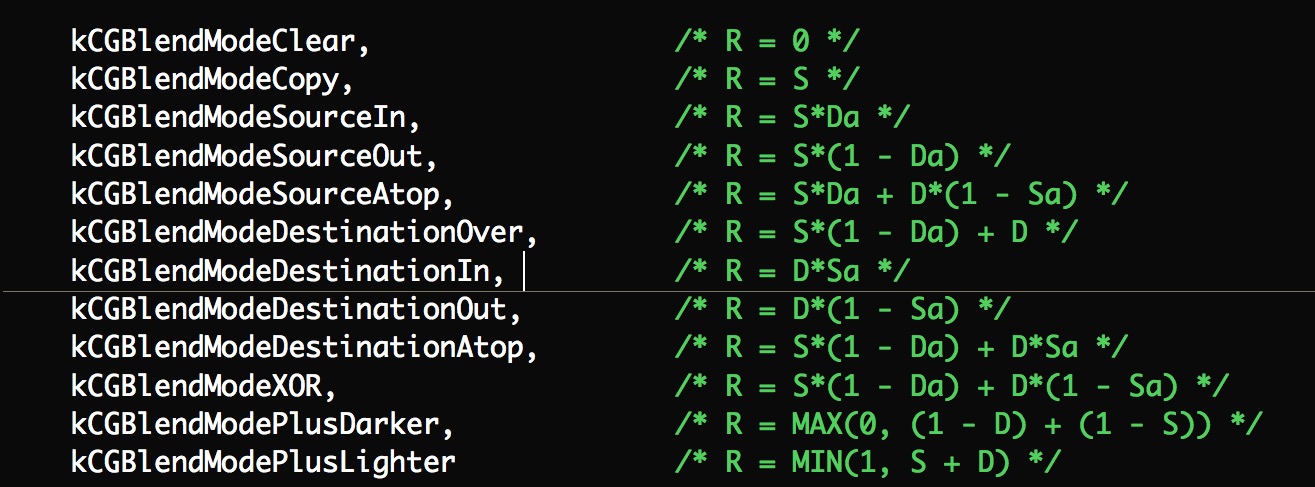
R表示结果,S表示包含alpha的原色,D表示包含alpha的目标色,Ra,Sa和Da分别是三个的alpha。 此处我们想要的结果就是目标色和原色透明度的加成 选用kCGBlendModeDestinationIn
为了方便以后使用写一个UIImage的Category:
.h
@interface UIImage (Tint)

- (UIImage *) imageWithTintColor:(UIColor *)tintColor;

@end
.m
@implementation UIImage (Tint)
- (UIImage *) imageWithTintColor:(UIColor *)tintColor
{
    //We want to keep alpha, set opaque to NO; Use 0.0f for scale to use the scale factor of the device’s main screen.
    UIGraphicsBeginImageContextWithOptions(self.size, NO, 0.0f);
    [tintColor setFill];
    CGRect bounds = CGRectMake(0, 0, self.size.width, self.size.height);
    UIRectFill(bounds);

//Draw the tinted image in context
    [self drawInRect:bounds blendMode:kCGBlendModeDestinationIn alpha:1.0f];

    UIImage *tintedImage = UIGraphicsGetImageFromCurrentImageContext();
    UIGraphicsEndImageContext();

       return tintedImage;
}
@end
使用的时候用UIImage的对象调用就可以了:测试结果如下:

...发现tintColor的颜色虽然是变了, 但是边框以及星星周边的棱角没有了, 整个一渐变色, 有点丑~~ kCGBlendModeDestinationIn:R = D * Sa,我们虽然保留了原色的透明度,但是缺丢失了所有的灰度信息,blendMode还有另外一枚举kCGBlendModeOverlay,它可以保持背景色的灰度信息
- (UIImage *) imageWithTintColor:(UIColor *)tintColor
{
    //We want to keep alpha, set opaque to NO; Use 0.0f for scale to use the scale factor of the device’s main screen.
    UIGraphicsBeginImageContextWithOptions(self.size, NO, 0.0f);
    [tintColor setFill];
    CGRect bounds = CGRectMake(0, 0, self.size.width, self.size.height);
    UIRectFill(bounds);

    //Draw the tinted image in context
    [self drawInRect:bounds blendMode:kCGBlendModeOverlay alpha:1.0f];

    UIImage *tintedImage = UIGraphicsGetImageFromCurrentImageContext();
    UIGraphicsEndImageContext();

    return tintedImage;
}
测下结果如下:

呃,颜色及棱角都对了, 但是透明度又没了...那么既然我们用kCGBlendModeOverlay能保留灰度信息,用kCGBlendModeDestinationIn能保留, 那用两个blendMode画两次就行了呗, 试下看看~~
- (UIImage *) imageWithTintColor:(UIColor *)tintColor
{
    //We want to keep alpha, set opaque to NO; Use 0.0f for scale to use the scale factor of the device’s main screen.
UIGraphicsBeginImageContextWithOptions(self.size, NO, 0.0f);
    [tintColor setFill];
    CGRect bounds = CGRectMake(0, 0, self.size.width, self.size.height);
    UIRectFill(bounds);

    //Draw the tinted image in context
    [self drawInRect:bounds blendMode:kCGBlendModeOverlay alpha:1.0f];

    [self drawInRect:bounds blendMode:kCGBlendModeDestinationIn alpha:1.0f];

    UIImage *tintedImage = UIGraphicsGetImageFromCurrentImageContext();
    UIGraphicsEndImageContext();

    return tintedImage;
}
结果如下:

确实达到了我们想要的效果,但是要是只想要第一种效果的话, kCGBlendModeOverlay的效果就不需要了, 具体代码可以在OneV's Den大神的GitHub上找到.